

Crafting the Belt Accessory for Ninetails
The next section of work for this costume is for the belt, some attachments for the tails, and wig construction. This is a large statement pieces for the front of the costume and I wanted to make sure it did the design justice.
Materials Used
Paper and pen for patterning
Worbla ( brown; what I had on hand)
2mm craft foam
Gesso and gold paint
Vector artwork program (for digitizing artwork)
optional
Ciricut ( to cut out design)
Optional could cut out by hand with craft knife
Heat gun
Starting to Craft the belt
I started first planning the belt by getting the size of the shape mocked up on paper. I started with a simple grid and sketched the shape I wanted. I made took into account how tall and wideI wanted to belt buckle ( for lack of a better word?) to be on my torso. It’s a large central piece so balancing it visually would help make it look cohesive with the dress as a whole.

Step 1 - Mock up shape
Tools used for this phase: paper, pencil pen/marker, ruler
After drawing out an initial shape I cut it out and checked the size and placement. Then I repeated this process on paper until I came up with a shape that made me happy.
Step 2 - Digitize and cut
Tools used for this phase: photo, vector drawing program, craft cutting machine, craft foam, worbla, heat gun
Note: I used my available tools to get a precise shape and cut. You by no means HAVE to use these tools and I will mention work arounds.
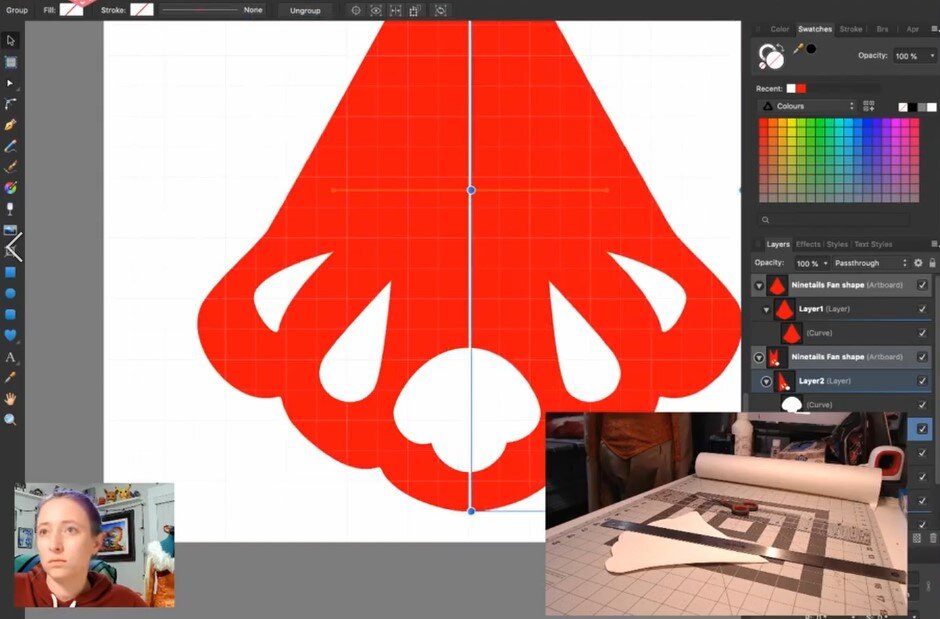
Next I took a picture of my physical mock up and imported it into Affinity Designer. This is a vector drawing program comparable to Adobe Illustrator. There are some free vector drawing programs out there but I prefer Affinity and use it for other parts of my work.
With the picture in my program I go about the process of drawing the vector shape using the picture as a guide for shape and sizing. It takes some guess work out of the process of drawing the shape initially. I am not good enough to just draw the shape I want without mock ups first.
Once I am happy with the digital shape/drawing I am going to save the image out as a JPG and prepare it for my next step; cutting the foam base with my Cricut!
Note: if you do not have access to a cutting machine like this you can print out your image at 100% and use that as a template to cut directly on your foam.
Vector drawing with affinity Designer

Using Cricut program
After opening Cricut design space and turning my machine on. I created a new project for the belt buckle and import the image. With the import process in Cricut you can delete out anything you do not want to keep as part of the cut image. There are TONS of tutorials about this on YouTube. Once my image is imported and sized correctly in my project file I choose to “make it” and the software takes me to the next steps where it shows me a preview and I pick my cutting preferences. I have a Cricut Maker and it has a lot of settings for different materials. I can selected Craft Foam, load my material onto my sticky mat and feed it into the start position. Once that is all set I push the start button and wait for the cut to complete. Once done I remove all the pieces of foam that should be discarded.
Step 3 - Test it out
Now is a great time to test out how the belt and buckle would theoretically work together. The belt actually fastens by going around the body, into the large main hole, and out through two small holes with the excess free flowing out the front. It took me a while to break down the image enough for me to understand how it would be functional.


Step 4 - Making the Final
Materials/Tools used: Craft Foam, Cutting Tools, Worbla, Heat Gun, Sand paper, primer, craft paint, paint sealer ( I used matte varnish)
Ready to commit to the real deal. Cut your shape out of craft foam and then use worbla, heated up with a heat gun, to shape and cover the foam to give it structure. After this I primed and sanded the surface until it was smooth. With my gold craft paint I painted the prepared surface and set it aside to dry. The paint I used was a little uneven so I applied a couple of thin layers until the coverage was even and I was happy with the sheen.

